GROUPON GUIDE TO CHICAGO
DIY Candles with Jess Duff of Milton and Margie's Soy Wax Candles
BY: Andrea Marchiano |Apr 30, 2013
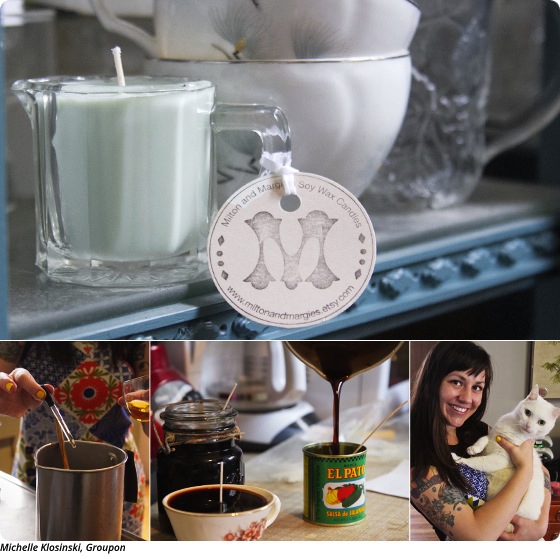 The first thing that Milton of Milton and Margie’s Soy Wax Candles said upon meeting me was “Meow.” Milton, of course, is a cat—his owner, Jess Duff, is the actual candle-maker in the family. A crafter for much of her life, Jess started making candles as a way to reuse the blob-like wax remnants of old pillar candles. “I was melting those down and putting them in jars that I had,” she says. “And I was like, ‘Oh, this is so much fun!’” Her business started shortly thereafter, its name inspired by Milton and another cat she had at the time, Margie.
Today, Jess scours thrift shops in Chicago and beyond to find an eclectic mix of mugs, Mason jars, cans, and cowboy boot–shaped glasses to hold her soy-wax creations. And although she has had plenty of time to perfect her candle-making technique, she insists it’s an ideal craft for first-timers: “It’s very forgiving,” she says. Below, she shares the supplies and steps needed to create a candle of your very own.
What You Need:
Metal pitcher or double boiler for melting the wax (Jess uses a pitcher)
Wooden spoon
Wax
Wicks
Wick stickers
Thermometer
Containers to hold the candles
Dye and fragrance (optional)
Eyedroppers (for adding fragrance; also optional)
Craft stores often sell candle-making starter kits with most of these supplies included.
What You Do:
1. Tie on an apron or change into clothes you don’t mind getting messy. “The wax often splashes, and it’s kind of hard to get out of your clothes,” Jess says.
2. Heat up the wax in a metal pitcher. Jess uses roughly a 2-cup scoop of wax per candle, but the amount will vary depending on the size of the container you want to fill.
3. As the wax melts, stick the wicks to the bottom of the containers with wick stickers. Wick stickers prevent the wick from moving when you pour in the wax.
4. Melt the wax until it reaches a see-through, liquid consistency. Then, let it cool until it’s slushy. “When it’s slushy, it settles more evenly,” she says. If you pour wax when it’s too hot, it can create bubbles and holes inside of the candle that make it burn differently.
5. As the wax cools, mix in dyes. The heat helps them blend in.
6. Now’s the time to mix in fragrances, too. Fragrance bottles list the oil’s flash point. Check the wax’s temperature to make sure it’s not over this threshold, as too much heat can cause scents to evaporate. As for deciding how much fragrance to put in, Jess says it’s all about personal preference.
7. Stir the wax to make sure the dyes and fragrances distribute evenly.
8. When the wax cools to between 100 and 115 degrees—again, it should have a slushy consistency—it’s ready to pour.
9. Let your candles set overnight before moving or lighting them.
The first thing that Milton of Milton and Margie’s Soy Wax Candles said upon meeting me was “Meow.” Milton, of course, is a cat—his owner, Jess Duff, is the actual candle-maker in the family. A crafter for much of her life, Jess started making candles as a way to reuse the blob-like wax remnants of old pillar candles. “I was melting those down and putting them in jars that I had,” she says. “And I was like, ‘Oh, this is so much fun!’” Her business started shortly thereafter, its name inspired by Milton and another cat she had at the time, Margie.
Today, Jess scours thrift shops in Chicago and beyond to find an eclectic mix of mugs, Mason jars, cans, and cowboy boot–shaped glasses to hold her soy-wax creations. And although she has had plenty of time to perfect her candle-making technique, she insists it’s an ideal craft for first-timers: “It’s very forgiving,” she says. Below, she shares the supplies and steps needed to create a candle of your very own.
What You Need:
Metal pitcher or double boiler for melting the wax (Jess uses a pitcher)
Wooden spoon
Wax
Wicks
Wick stickers
Thermometer
Containers to hold the candles
Dye and fragrance (optional)
Eyedroppers (for adding fragrance; also optional)
Craft stores often sell candle-making starter kits with most of these supplies included.
What You Do:
1. Tie on an apron or change into clothes you don’t mind getting messy. “The wax often splashes, and it’s kind of hard to get out of your clothes,” Jess says.
2. Heat up the wax in a metal pitcher. Jess uses roughly a 2-cup scoop of wax per candle, but the amount will vary depending on the size of the container you want to fill.
3. As the wax melts, stick the wicks to the bottom of the containers with wick stickers. Wick stickers prevent the wick from moving when you pour in the wax.
4. Melt the wax until it reaches a see-through, liquid consistency. Then, let it cool until it’s slushy. “When it’s slushy, it settles more evenly,” she says. If you pour wax when it’s too hot, it can create bubbles and holes inside of the candle that make it burn differently.
5. As the wax cools, mix in dyes. The heat helps them blend in.
6. Now’s the time to mix in fragrances, too. Fragrance bottles list the oil’s flash point. Check the wax’s temperature to make sure it’s not over this threshold, as too much heat can cause scents to evaporate. As for deciding how much fragrance to put in, Jess says it’s all about personal preference.
7. Stir the wax to make sure the dyes and fragrances distribute evenly.
8. When the wax cools to between 100 and 115 degrees—again, it should have a slushy consistency—it’s ready to pour.
9. Let your candles set overnight before moving or lighting them. BY:
Deals in Chicago

Pasta Making Class Deals & Discounts | Master Fresh Handmade Pasta
26% discount_off
$32 with_code SAVE
Pasta Making Classes on Classpop!
Trending
Regal Movie Ticket Deals & Discounts on Premiere & Premium Format
1471 W Webster Ave, Chicago • 5.0 mi
Regal
Fun Cooking Classes | Top Chefs, Hands-On & Fun for All Levels
30% discount_off
$55.20 with_code SAVE
Cooking Classes on Classpop!
Deals in Chicago Other Deals in Chicago

Trending
Cinemark Movie Club Membership – Monthly Movies & Perks
1001 West North Avenue, Melrose Park • 10.9 mi
15% discount_off
$44.80 with_code SAVE
Cinemark
Paint Nite Class Deals for One - Four People - Save on Creative Sessions!
1758 West Grand Avenue, Chicago • 3.1 mi
31% discount_off
$113.96 with_code SAVE
Paint & Sip Class by Paint Nite
Sushi Making Class Deals & Discounts | Learn to Roll Like a Pro
26% discount_off
$32 with_code SAVE
Sushi Making Classes on Classpop!