Make Your Own Yoga Bolster and Mat-Carrying Strap
No matter how relaxed and centered you are, it’s still a hassle to lug a bulky bolster and mat to yoga classes. A yoga bag seems like the perfect solution—but those can run upwards of $80 at boutique retailers.
Take a deep breath; this simple DIY details how to sew your own yoga bolster and strap. The bolster—outfitted with a handle—allows bodies to ease into supported chest- and back-opening poses. The strap serves as a tool for carrying a mat around town, and for holding particularly difficult poses in class. The price tag puts wallets at ease, too, as you can get all the components for about $25. (Pro-tip: these accessories also make great gifts for women and men who want to travel to yoga class in style.)
What You Need:
- Sewing machine
- Thread Needle
- Iron
- Tape measure
- 3 yards of fabric
- 4 yards of cotton batting (get the organic kind if you really want to impress your fellow classmates)
- Some basic sewing skills—or a willingness to learn!
What You Do:
Note: Unless otherwise specified, sew each piece with the pattern sides facing each other. Make sure to press your seams between each step.
Set-up:
1. Iron all the fabric.
2. Cut out the necessary pieces:
- Front and Back Main Panels (2): 10”x30”
- Side Panels (2): 5”x30”
- Top and Bottom Panels (2): 10”x5”
- Bolster Strap (1): 8”x4”
- Yoga Strap (1): 2 yds.x5”

Bolster:
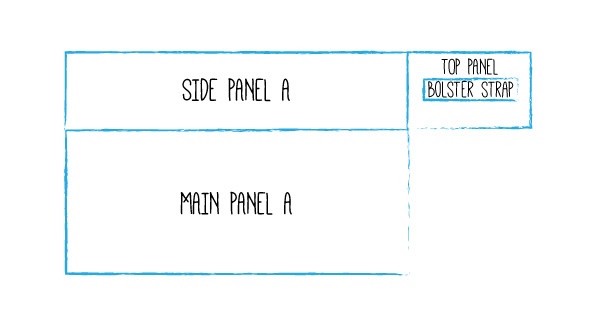
3. Sew Side Panel A to Top Panel.

4. Fold the Bolster Strap in half and sew the edges together. Turn the strap inside out so that the pattern sides are showing. Iron the strap flat, and sew ½ inch seams on both edges. Fold the ends under ¼ inch, and sew them flat.

5. Sew the Bolster Strap onto the Top Panel (which is sewn to Side Panel A). Sew Main Panel A onto Side Panel A.
6. Sew Side Panel B onto Main Panel A.
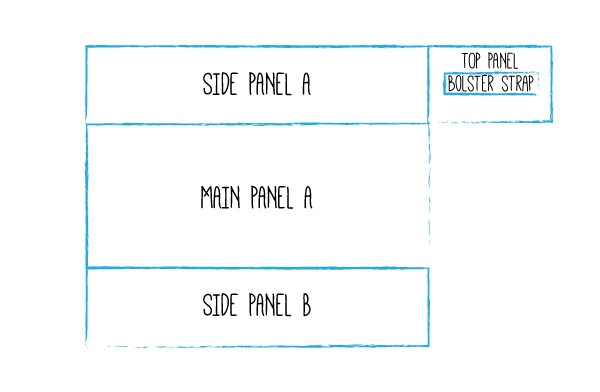
7. Sew Main Panel B onto Side Panel B. Then, sew the bottom edge of the Top Panel onto the top edge of Main Panel A. Again, make sure the patterned sides of the fabric are facing each other when you do this!

8. Sew the Top Panel’s remaining edges onto Side Panel B and Main Panel B. Then, sew Main Panel B onto Side Panel A. This gives you the basic rectangular shape of your bolster—though of course, it’s inside out, and its bottom is hanging open!
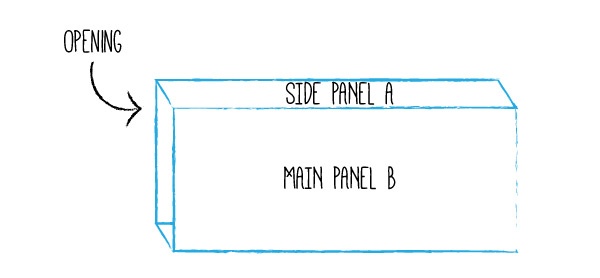
9. Sew two adjacent edges of the Bottom Panel onto the open end of the bolster, leaving two edges undone. (You need it open so that you can stuff it!)
10. Turn the bolster shape inside out so that the patterned sides are showing. For a professional-looking finish, push the corners out with the end of a pen.
11. Stuff the bolster with cotton batting.
12. Return to the remaining unsewn sides of the Bottom Panel. Fold the edges under and sew them closed by hand. Your bolster is complete!
Strap:
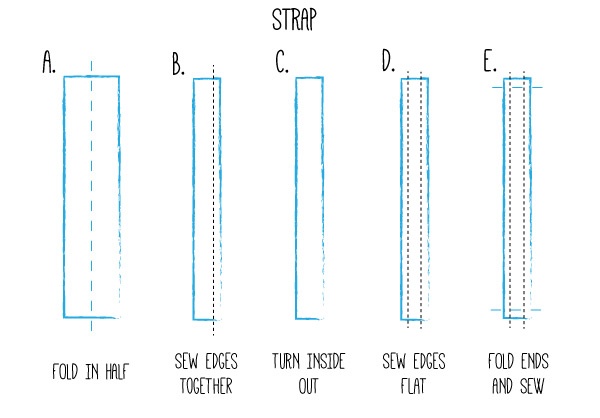
13. Fold the strap in half and sew the edges together. Turn the strap inside out so that the pattern sides are showing. Iron the strap flat, and sew ½ inch seams on both edges. Fold the ends under ¼ inch and sew them flat.
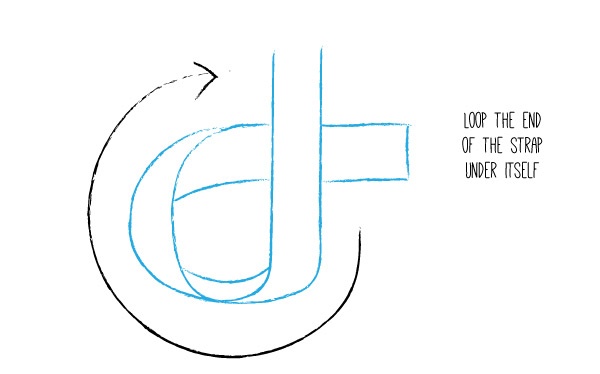
14. Loop one end of the strap under the body of the strap.
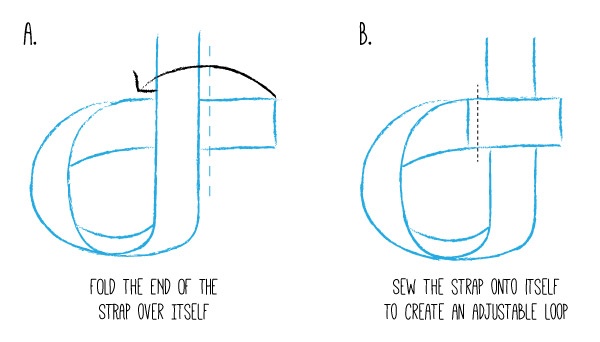
15. Fold the end of the strap over the body of the strap, and sew the end onto itself to make an adjustable loop.
16. Repeat the previous two steps for the other end of the strap. You're done!
Photographs by Andrew Nawrocki; illustrations by Jess Duff, Groupon.
Now that you have the accessories, read up on yoga trends:
Yes, Yoga is a Sport
What Do You Wear Under Yoga Pants? I Asked 400 People.
Deals in chicago

Deals in chicago Other Deals in chicago